
Using GREP Command
Unix/Linux ကိုလေ့လာနေသူတွေအနေနဲ့ မသိမဖြစ်တဲ့ Command လေးတစ်ခုပါ။ Text File, Config File, Log File နှင့် Command တစ်ခုကနေထွက်လာတဲ့ Output စတာတွေထဲကမှ လိုအပ်တဲ့ information ကို ရှာဖွေထုတ်ယူတဲ့အခါမျိုးမှာ သုံးလေ့ရှိပါတယ်။ ဘယ်လောက်ထိ အသုံးဝင်၊ အသုံးတည့်တယ်ဆိုတာကတော့ အသုံးချမှုပေါ်မူတည်ပါလိမ့်မယ်။ လေ့လာရလွယ်ကူစေဖို့အတွက် lab environment တစ်ခုပြုလုပ်ကြပါမယ်။ ဒီ Post မှာတော့ Mac OS X အသုံးပြုပြီး ပြပေးထားတာပါ။ ဒါပေမယ့် Linux မှာလည်း အတူတူပါပဲ။
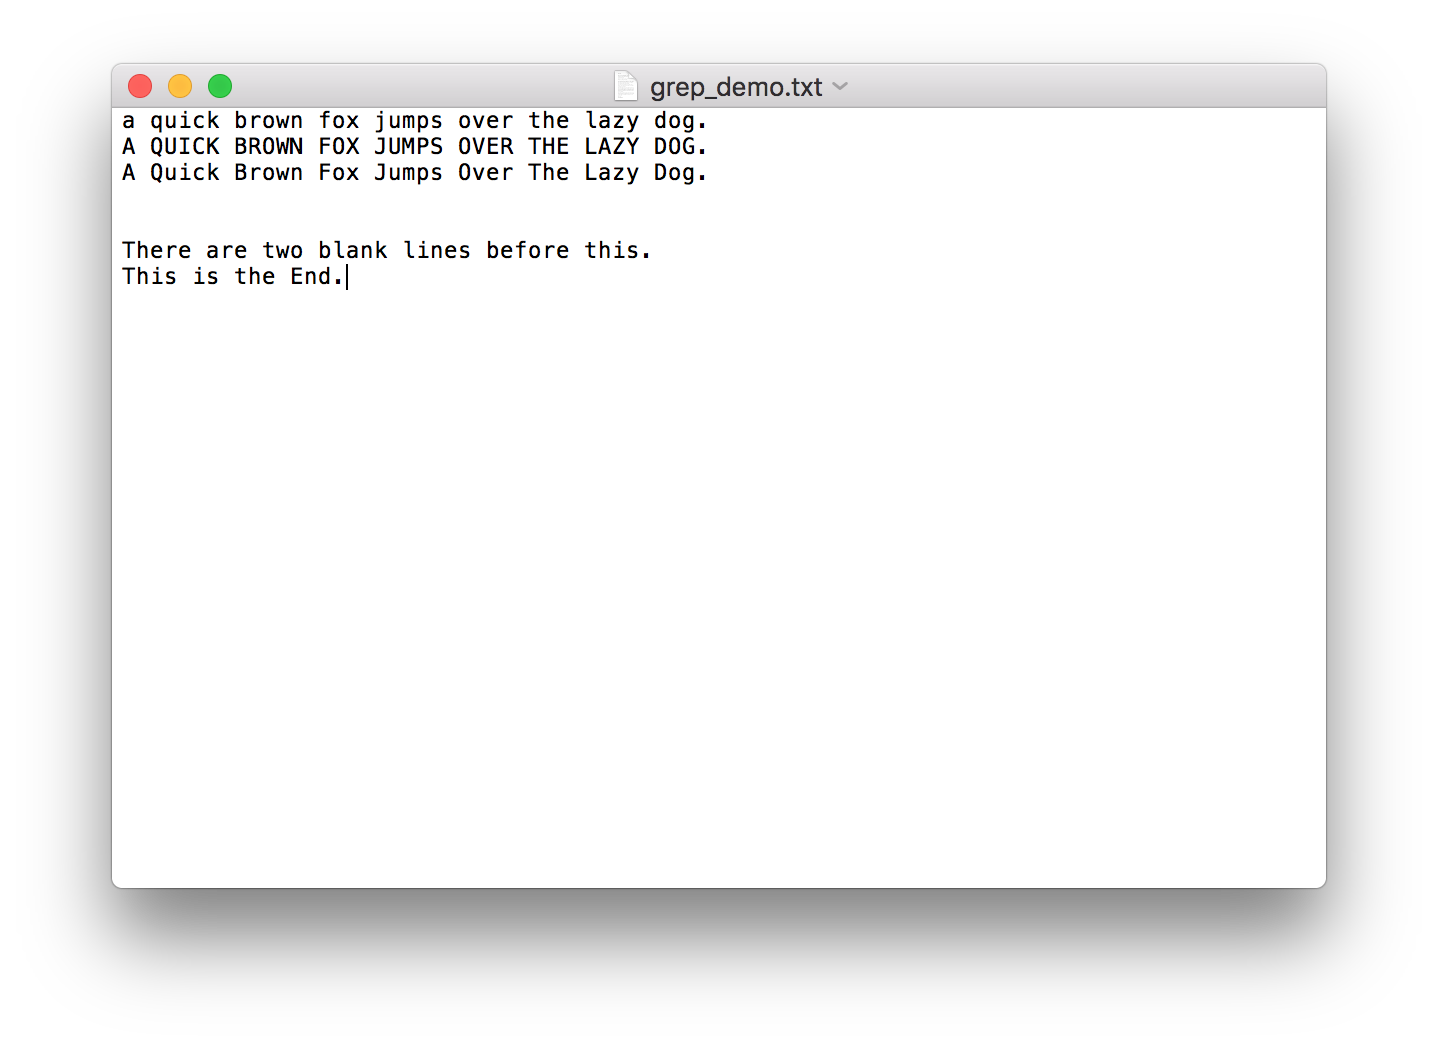
အလျှင်ဦးဆုံး Text Editor တစ်ခုခုသုံးပြီး အောက်မှာ ဖော်ပြထားတဲ့ စာသားတွေပါဝင်တဲ့ Text File တစ်ခုကို Desktop ပေါ်မှာတည်ဆောက်လိုက်ပါ။ File Name ကိုတော့ grep_demo.txt လို့ပေးပြီး Save လုပ်လိုက်ပါ။
a quick brown fox jumps over the lazy dog.
A QUICK BROWN FOX JUMPS OVER THE LAZY DOG.
A Quick Brown Fox Jumps Over The Lazy Dog.


There are two blank lines before this.
This is the End.
ဖိုင်တည်ဆောက်ပြီးပြီဆိုလျှင်တော့ Terminal ကိုဖွင့်လိုက်ပါ။ grep_demo.txt ဖိုင်ရှိတဲ့ Desktop Directory ထဲကို ဝင်ပြီး grep_demo1.txt ဆိုတဲ့ဖိုင်တစ်ဖိုင် copy ပွားလိုက်ပါ။ demo နာမည်နဲ့ directory တစ်ခုတည်ဆောက်ပြီး grep_demo.txt ကို ထပ်ပြီး copy ကူထည့်ထားလိုက်ပါ။
$ cd ~/Desktop
$ cp grep_demo.txt grep_demo1.txt
$ mkdir demo
$ cp grep_demo.txt demo
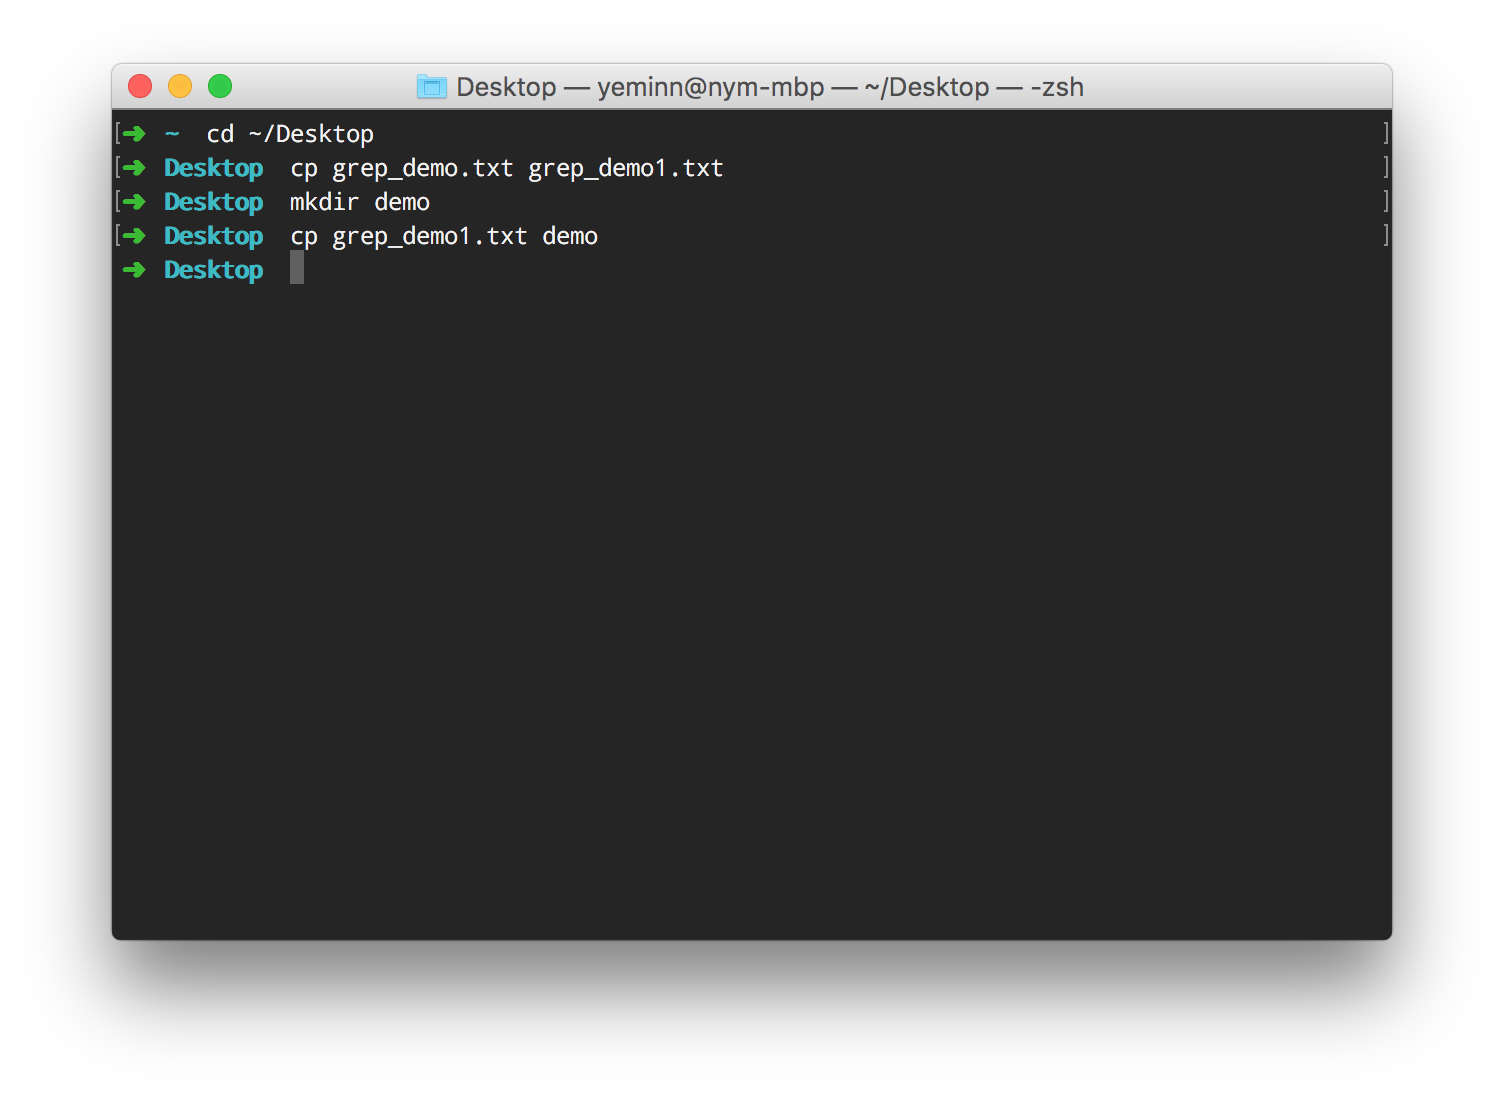
File နှင့် Folder Structure ကတော့ အောက်ပါအတိုင်းဖြစ်ပါတယ်။
Desktop
├── demo
│   └── grep_demo.txt
├── grep_demo.txt
└── grep_demo1.txt
အသင့်ဖြစ်ပြီဆိုလျှင်တော့ စတင်လေ့လာကြည့်ကြပါမယ်။
ဖိုင်ထဲမှစာသားအားရှာဖွေခြင်း
ပေးထားတဲ့အတိုင်း ဖွင့်ထားတဲ့ Terminal မှာရိုက်ကြည့်လိုက်ပါ။
Command
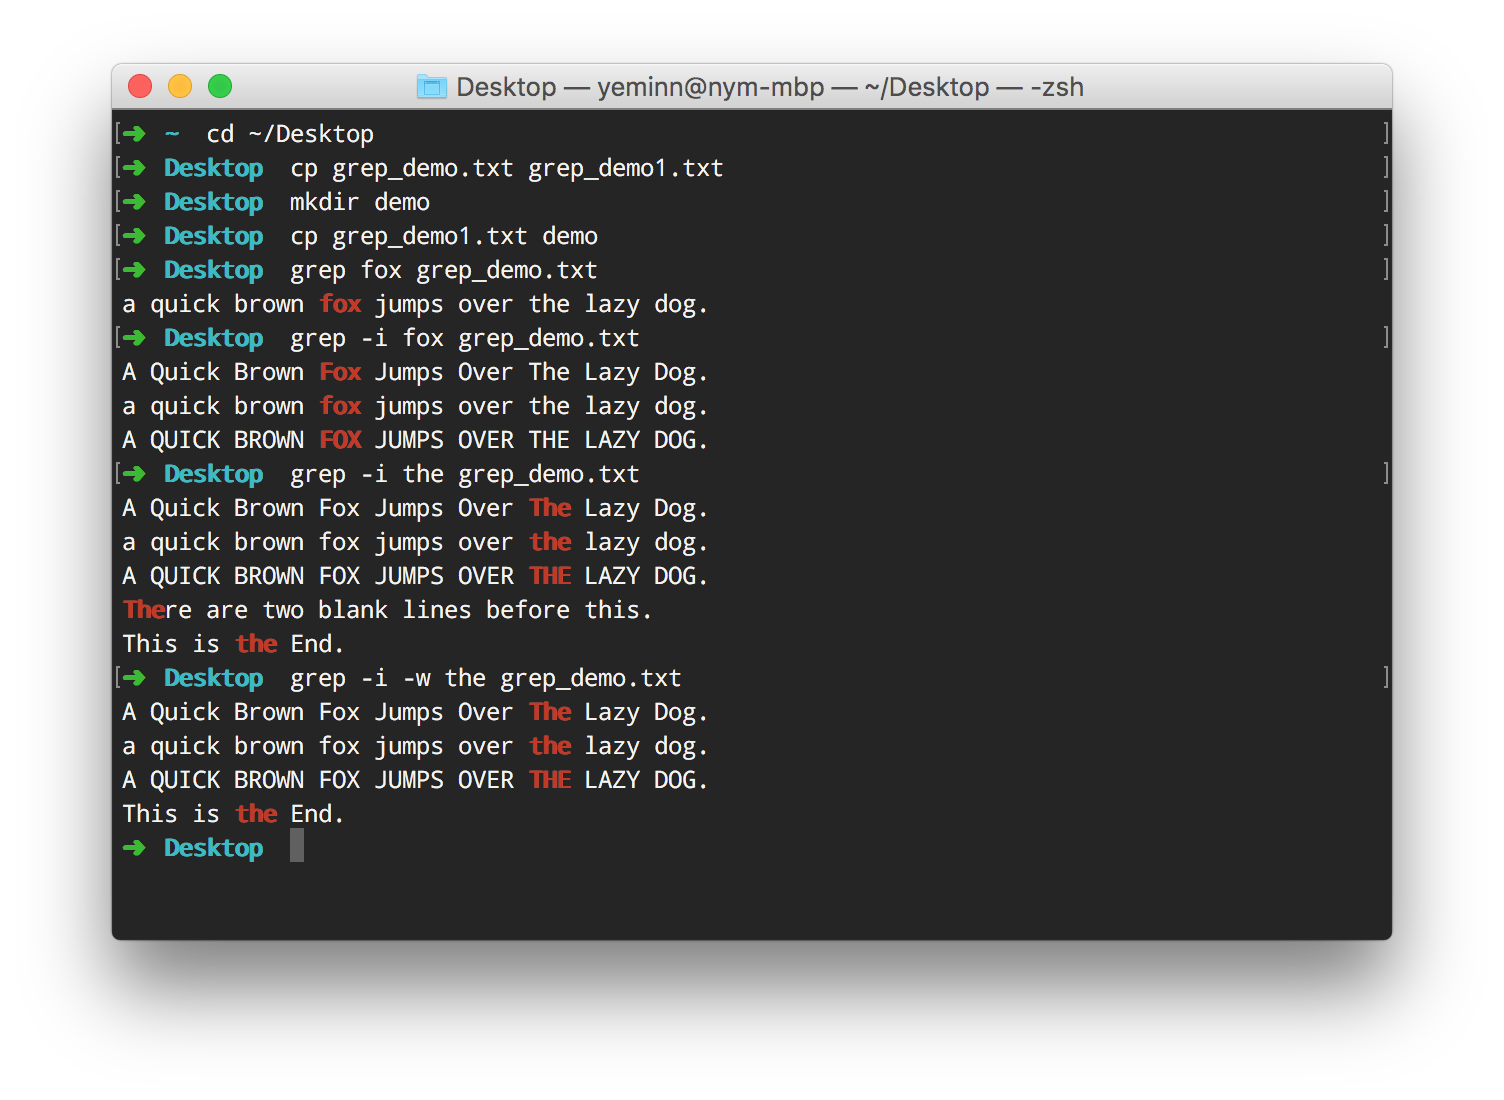
$ grep fox grep_demo.txt
Output
a quick brown fox jumps over the lazy dog.
grep_demo.txt ဆိုတဲ့ ဖိုင်ထဲမှာရှိတဲ့ စာသားတွေထဲကမှ စာလုံးအသေးနဲ့ရေးထားတဲ့စာကြောင်း တစ်ကြောင်းထဲကိုရွေးထုတ်ပြီးပြပေးတာတွေ့ရပါလိမ့်မယ်။ အကြောင်းကတော့ fox ဆိုတဲ့စာလုံးပါနေတာကြောင့်ပါပဲ။ ဒီနေရာမှာ မေးစရာရှိတာက fox ဆိုတဲ့ စာလုံးပါတာခြင်းအတူတူ တခြား fox ပါတဲ့စာကြောင်းနှစ်ကြောင်းကိုကျ ဘာလို့မပြတာလည်းဆိုတာပါ။ အဖြေကရှင်းပါတယ်။ Case Sensitive ဖြစ်လို့ပါ။ ကျန်စာကြောင်း နှစ်ကြောင်းမှာက စာလုံးအသေး fox မဟုတ်ပဲ FOX နဲ့ Fox ဖြစ်နေတာကြောင့်ပါ။
Case Sensitive မဖြစ်ပဲ fox ဆိုတဲ့စာလုံးပါတဲ့စာကြောင်းတိုင်းကိုလိုချင်တယ်ဆိုလျှင်တော့ -i (insensitive) option ကိုသုံးနိုင်ပါတယ်။
Command
$ grep -i fox grep_demo.txt
Output
A Quick Brown Fox Jumps Over The Lazy Dog.
a quick brown fox jumps over the lazy dog.
A QUICK BROWN FOX JUMPS OVER THE LAZY DOG.
-i ထည့်လိုက်မယ်ဆိုလျှင်တော့ grep_demo.txt ထဲမှာက fox စာလုံးပါတဲ့ စာကြောင်း သုံးကြောင်းလုံးထုတ်ပြပေးတာကို မြင်ရပါလိမ့်မယ်။
အခုနောက်ထပ် the ဆိုတဲ့ စာသားကိုရှာကြည့်ပါမယ်။
$ grep -i the grep_demo.txt
Output
A Quick Brown Fox Jumps Over The Lazy Dog.
a quick brown fox jumps over the lazy dog.
A QUICK BROWN FOX JUMPS OVER THE LAZY DOG.
There are two blank lines before this.
This is the End.
-i သုံးပြီးရှာတာဖြစ်တဲ့အတွက် စားလုံး အကြီး၊ အသေးမရွေးပဲ the ပါတဲစာကြောင်းတိုင်းကိုထုတ်ပြပေးပါလိမ့်မယ်။ ဒါပေမယ့် မြင်တွေ့ရတဲ့အတိုင်း the အတိအကျမဟုတ်ဘဲ There ပါ ပါနေပါတယ်။ ဒါကြောင့် the အတိအကျပါတဲ့ စာကြောင်းတိုင်းလိုချင်တယ်ဆိုလျှင်တော့ -w (word) ကိုသုံးနိုင်ပါတယ်။
Command
$ grep -i -w the grep_demo.txt
        (OR)
$ grep -iw the grep_demo.txt
Output
A Quick Brown Fox Jumps Over The Lazy Dog.
a quick brown fox jumps over the lazy dog.
A QUICK BROWN FOX JUMPS OVER THE LAZY DOG.
This is the End.
the အတိအကျပါတဲ့ စာကြောင်းတွေကိုသာထုတ်ပြပေးပြီး There စာကြောင်းပါလာတော့မှာမဟုတ်ပါဘူး။
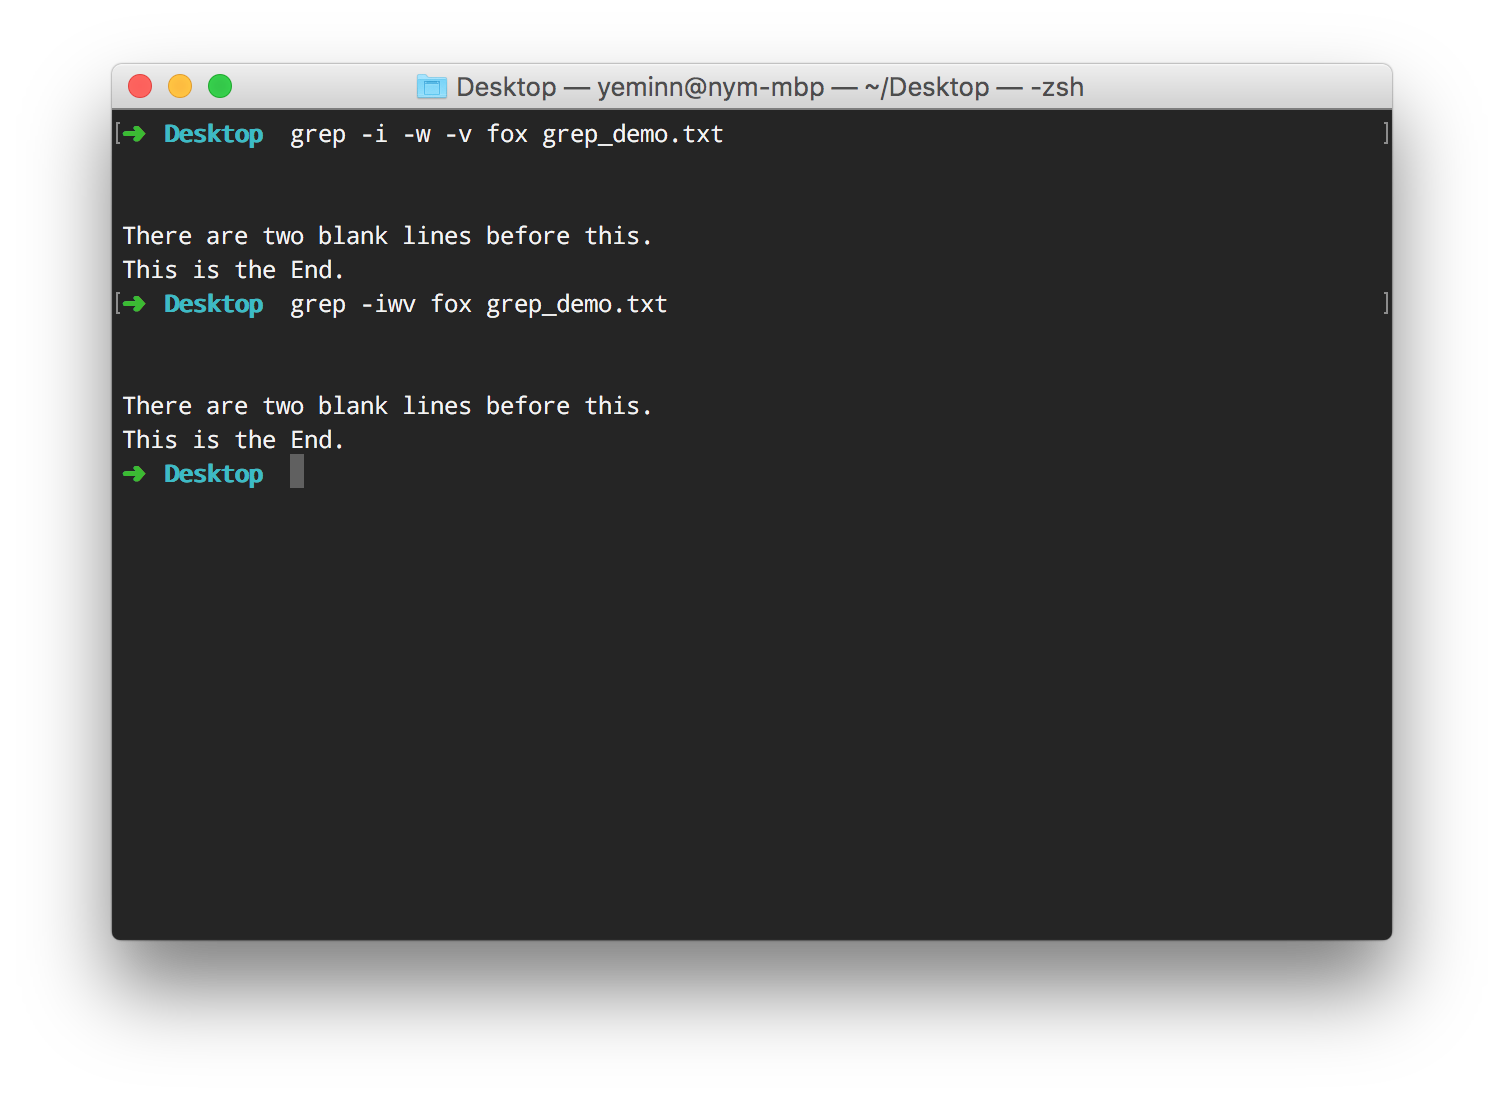
နောက်တစ်မျိုးအနေနဲ့ သတ်မှတ်စာသားမပါတဲ့ စာကြောင်းတွေကိုဘဲ ရွေးထုတ်ကြည့်ပါမယ်။ အဲဒီအတွက် သုံးရမယ့် option ကတော့ -v (invert) ပါ။
Command
$ grep -i -w -v fox grep_demo.txt
        (OR)
$ grep -iwv fox grep_demo.txt
Output
There are two blank lines before this.
This is the End.
Output အနေနဲ့ fox မပါတဲ့ စာကြောင်းနှစ်ကြောင်းနဲ့ blank line နှစ်ကြောင်းကိုတွေ့ရပါလိမ့်မယ်။
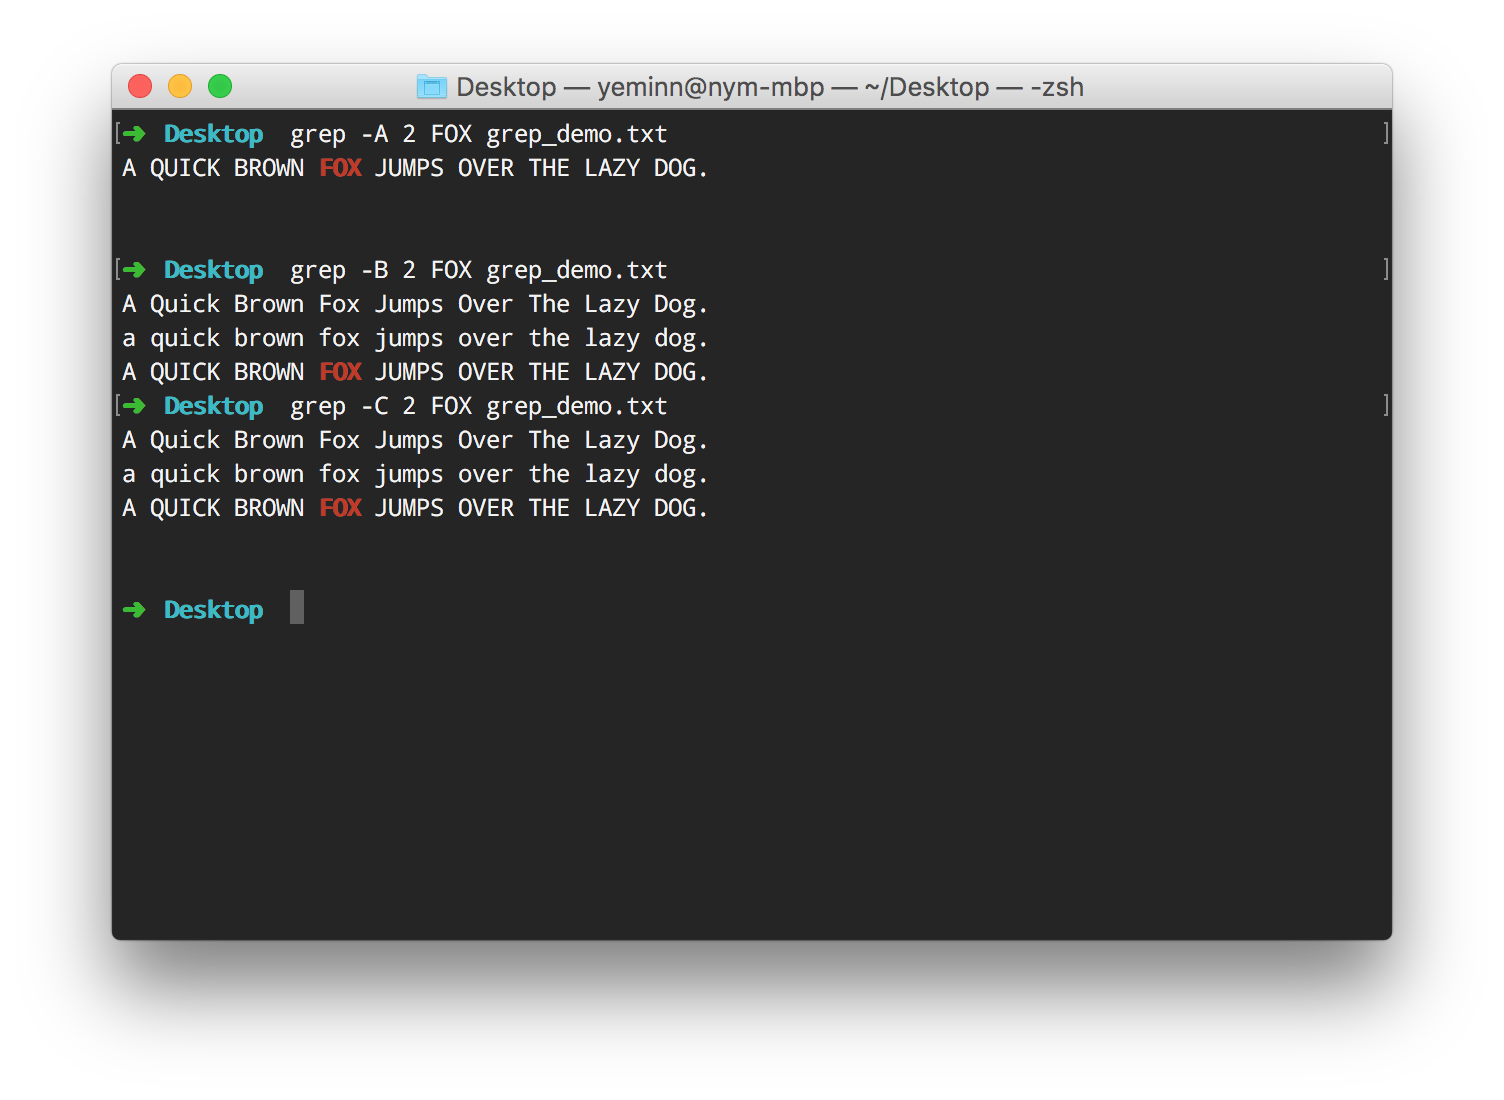
သတ်မှတ်စာသားပါဝင်တဲ့ စာကြောင်းအပြင် ကပ်လျှက်ရှိနေတဲ့ စာကြောင်းတချို့ကိုပါပါဝင်ထုတ်ပြပေးစေချင်တယ်ဆိုလျှင်တော့ -A (after) -B (before) တို့သုံးနိုင်ပါတယ်။ -A နဲ့ -B နောက်မှာ parameter အနေနဲ့ စာကြောင်းအရေအတွက်ကိုထည့်ပေးရပါလိမ့်မယ်။
Command
$ grep -A 2 FOX grep_demo.txt
Output
A QUICK BROWN FOX JUMPS OVER THE LAZY DOG.
-A 2 ဖြစ်တဲ့အတွက် FOX ပါတဲ့စာကြောင်းအပြင် အောက်ဘက်ကပ်လျှက် blank line နှစ်ကြောင်းကိုပါထုတ်ပြပေးပါလိမ့်မယ်။ -B 2 ဆိုလျှင်တော့ Before ဆိုတဲ့အတိုင်း အပေါ်ဘက်ကပ်လျှက် နှစ်ကြောင်းကိုပါထုတ်ပြပေးမှာပါ။
Command
$ grep -B 2 FOX grep_demo.txt
Output
A Quick Brown Fox Jumps Over The Lazy Dog.
a quick brown fox jumps over the lazy dog.
A QUICK BROWN FOX JUMPS OVER THE LAZY DOG.
Before ရော After ပါပြပေးစေချင်တယ်ဆိုလျှင်တော့ -C option ကိုသုံးနိုင်ပါတယ်။
Command
$ grep -C 2 FOX grep_demo.txt
Output
A Quick Brown Fox Jumps Over The Lazy Dog.
a quick brown fox jumps over the lazy dog.
A QUICK BROWN FOX JUMPS OVER THE LAZY DOG.
FOX ပါဝင်တဲ့ စာကြောင်းအပြင် အပေါ် အောက် ကပ်လျှက်စာကြောင်းနှစ်ကြောင်းစီကိုပါမြင်တွေ့ရမှာပါ။
ဖိုင်ထဲမှာရှိတဲ့ သတ်မှတ်စာသားပါဝင်မှုအရေအတွက်ကိုသိချင်လျှင်တော့ -c (count) ကိုသုံးနိုင်ပါတယ်။ Small Letter C ဆိုတာကိုတော့ ဂရုပြုမိမယ်ထင်ပါတယ်။
Command
$ grep -i -c fox grep_demo.txt
        (OR)
$ grep -ic fox grep_demo.txt
Output
3
fox ကို -i case insensitive နဲ့ရှာဖွေပြီး -c နဲ့ count လုပ်တာဖြစ်တဲ့အတွက် 3 ဆိုတဲ့ output ကိုမြင်တွေ့ရတာပါ။ -i မပါခဲ့ဘူးဆိုလျှင်တော့ 1 ဆိုပြီး count တစ်ခုတည်းရပါလိမ့်မယ်။
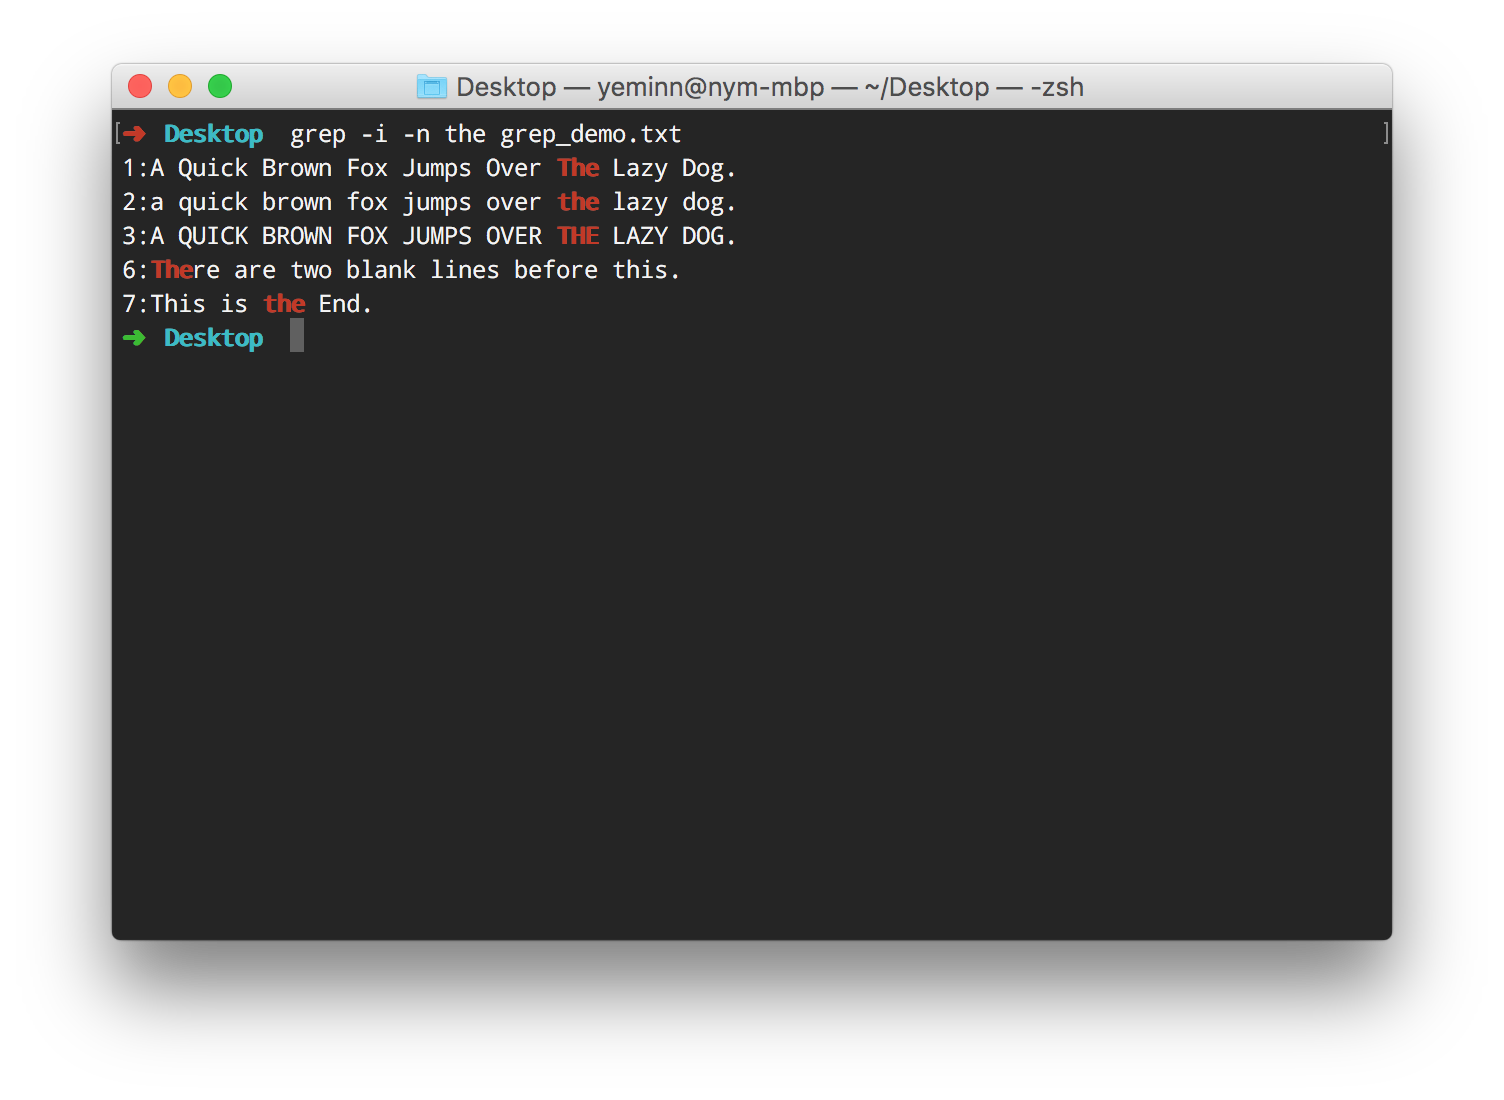
သတ်မှတ်စာသားတည်ရှိနေတဲ့ Line နံပါတ်ကိုပါ ဖော်ပြပေးစေချင်လျှင်တော့ -n (number) ကိုသုံးနိုင်ပါတယ်။
Command
$ grep -i -n the grep_demo.txt
        (OR)
$ grep -in the grep_demo.txt
Output
1:A Quick Brown Fox Jumps Over The Lazy Dog.
2:a quick brown fox jumps over the lazy dog.
3:A QUICK BROWN FOX JUMPS OVER THE LAZY DOG.
6:There are two blank lines before this.
7:This is the End.
ရှေ့ဆုံးမှာမြင်တွေ့ရတဲ့ 1,2,3,6,7 ဆိုတာတွေက Line Number ကိုဆိုလိုခြင်းဖြစ်ပါတယ်။
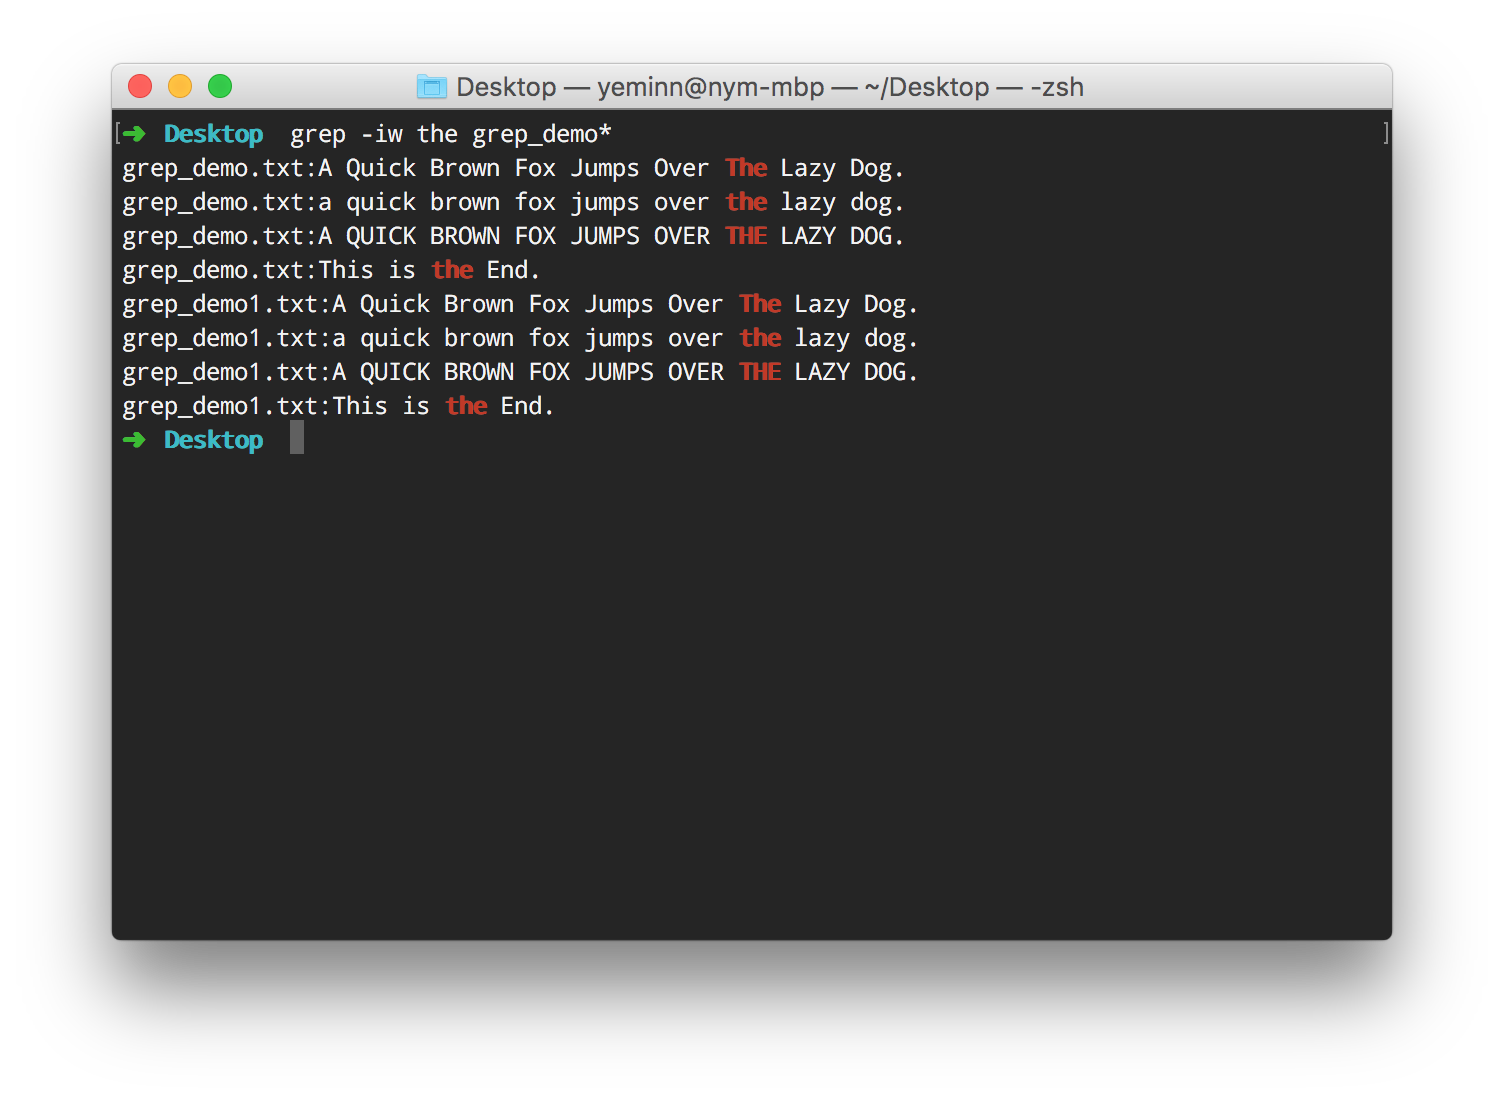
အခုဖော်ပြခဲ့သမျှအားလုံးကတော့ ဖိုင် တစ်ခုထဲက content တွေကို ရှာဖွေတဲ့ နည်းလမ်းတွေပါ။ အကယ်၍ Folder တစ်ခုအောက်မှာရှိသမျှ ဖိုင်အားလုံးထဲက content ကိုရှာချင်တာဆိုလျှင်လည်း * wildcard သုံးနိုင်ပါသေးတယ်။
Command
$ grep -iw the grep_demo*
Output
grep_demo.txt:A Quick Brown Fox Jumps Over The Lazy Dog.
grep_demo.txt:a quick brown fox jumps over the lazy dog.
grep_demo.txt:A QUICK BROWN FOX JUMPS OVER THE LAZY DOG.
grep_demo.txt:This is the End.
grep_demo1.txt:A Quick Brown Fox Jumps Over The Lazy Dog.
grep_demo1.txt:a quick brown fox jumps over the lazy dog.
grep_demo1.txt:A QUICK BROWN FOX JUMPS OVER THE LAZY DOG.
grep_demo1.txt:This is the End.
Desktop ပေါ်က grep_demo.txt နှင့် grep_demo1.txt နှစ်ဖိုင်လုံးမှာပါဝင်သမျှကို မြင်တွေ့ရပါလိမ့်မယ်။ File Name နဲ့ Content ကိုတော့ : နဲ့ခွဲခြားပြီးပြသပေးပါတယ်။
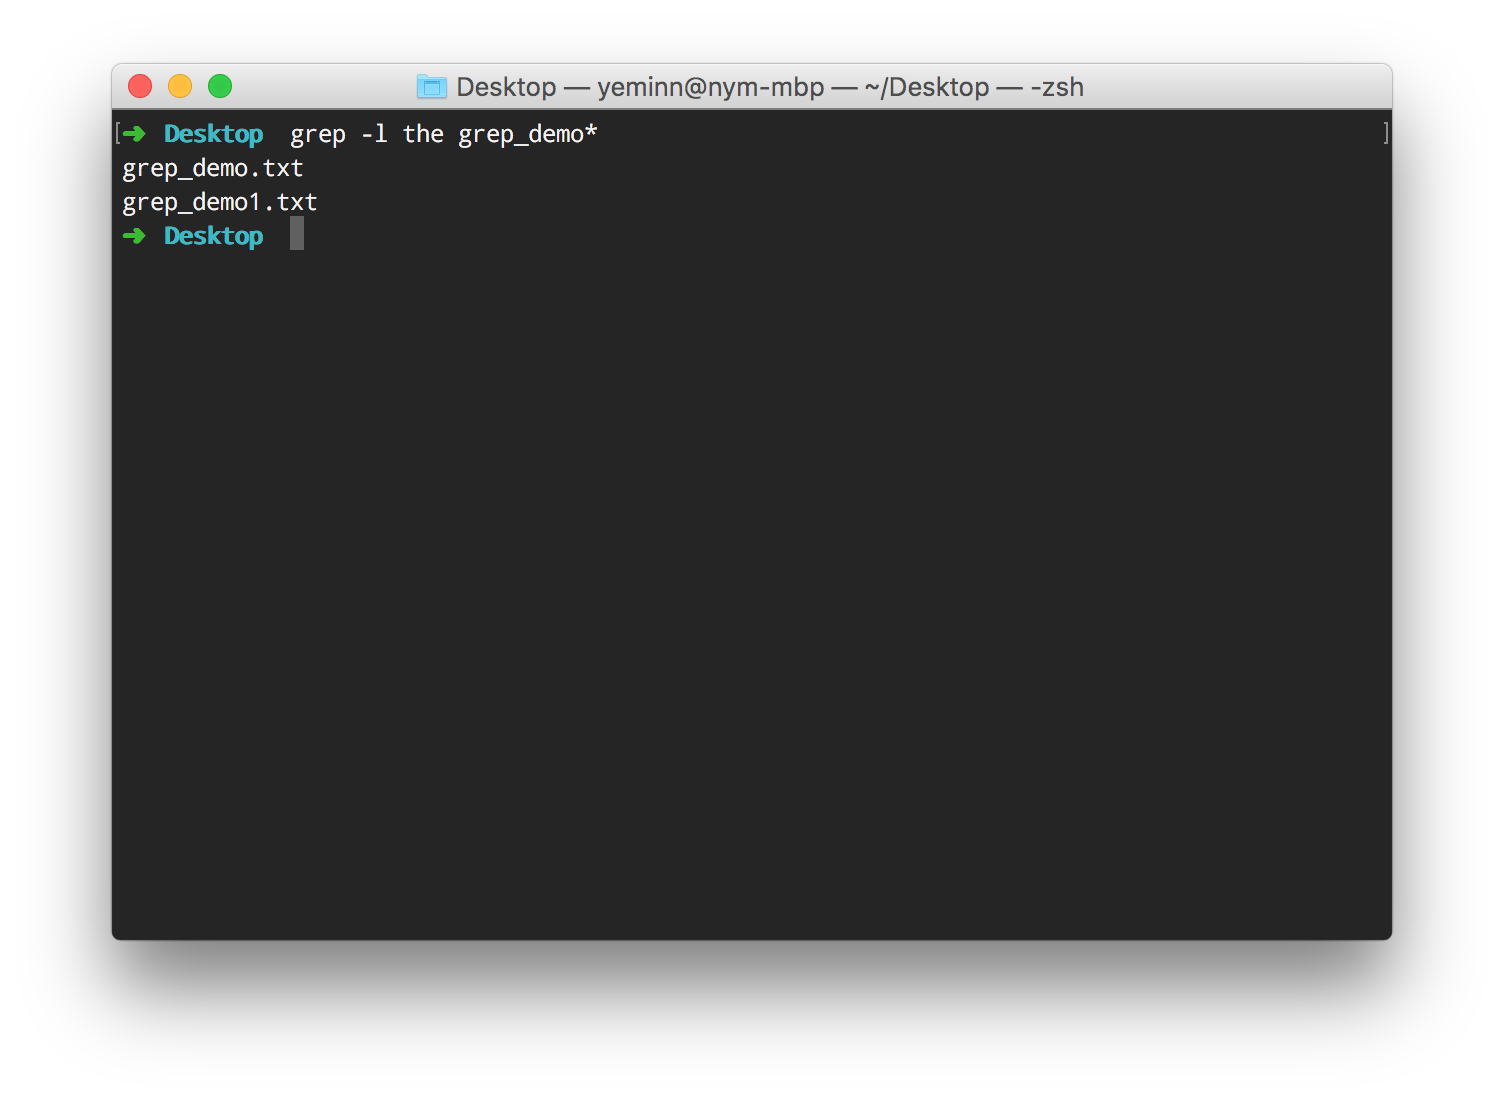
File Name:Content တွဲလျှက်မြင်တွေ့ရတာ ရှုပ်ထွေးမယ်ထင်လျှင်တော့ File Name သီးသန့်ကို -l Option နဲ့ ထုတ်ယူနိုင်ပါတယ်။
Command
$ grep -l the grep_demo*
Output
grep_demo.txt
grep_demo1.txt
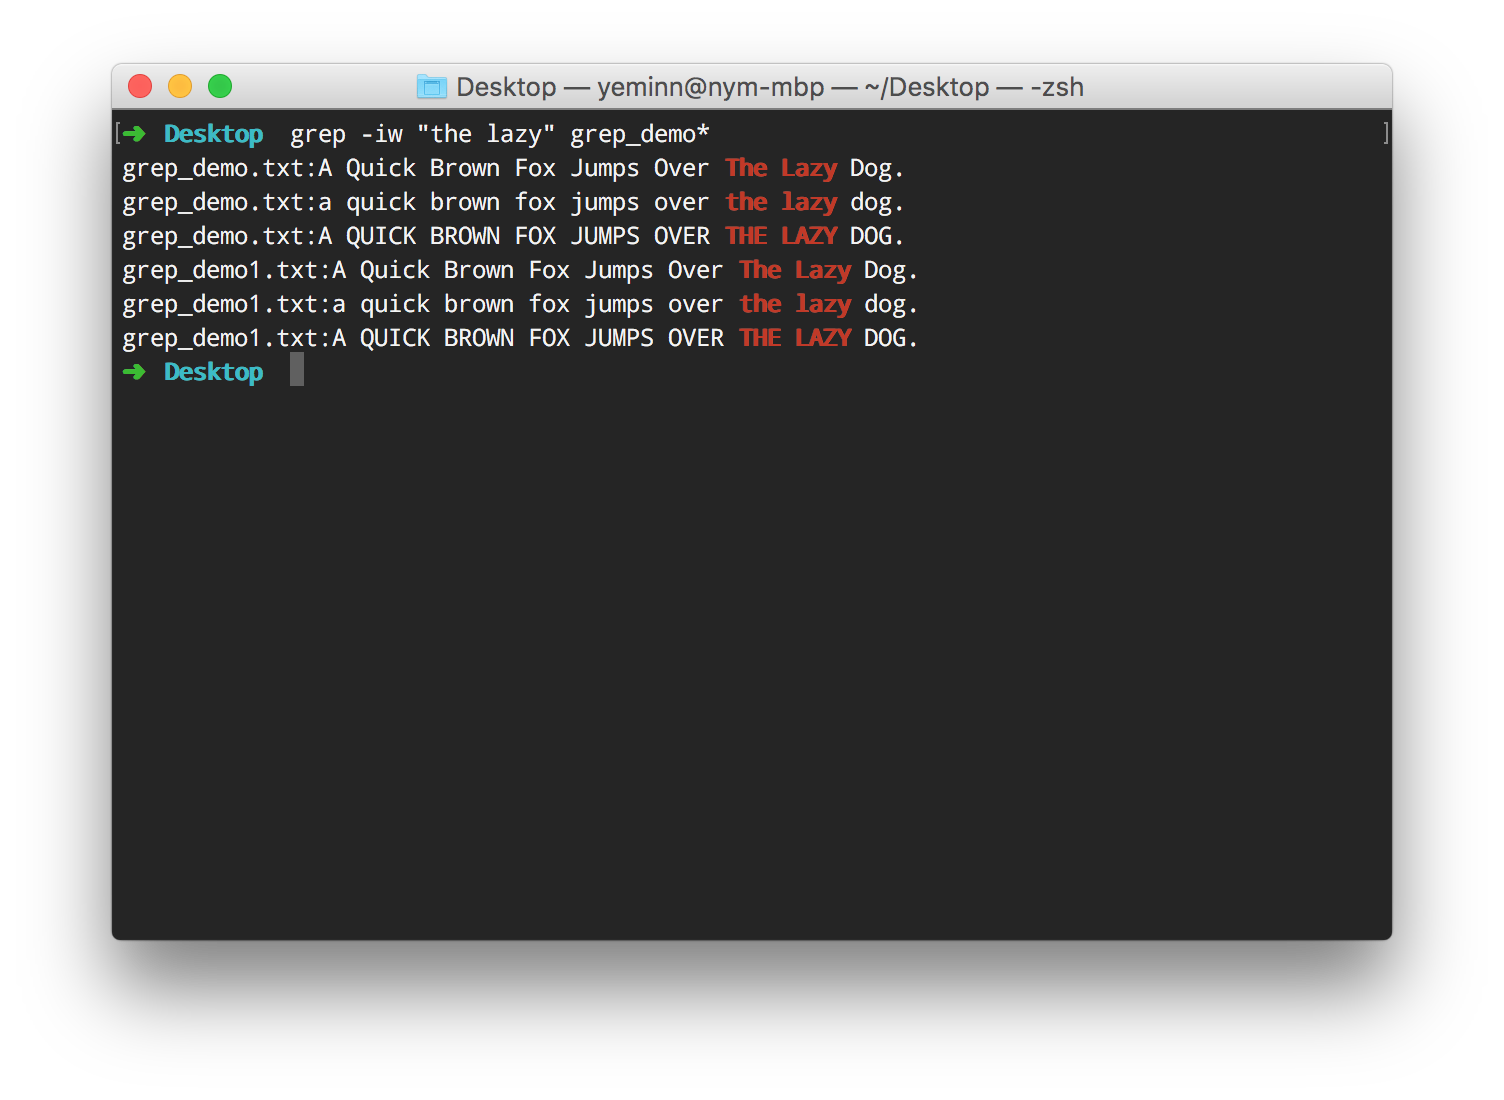
နောက်တစ်ခုက ရှာဖွေလိုတဲ့စာသားမှာ Space ပါဝင်နေမယ်ဆိုလျှင်တော့ "" Double Quote နဲ့ ဖော်ပြနိုင်ပါတယ်။
Command
$ grep -iw "the lazy" grep_demo*
Output
grep_demo.txt:A Quick Brown Fox Jumps Over The Lazy Dog.
grep_demo.txt:a quick brown fox jumps over the lazy dog.
grep_demo.txt:A QUICK BROWN FOX JUMPS OVER THE LAZY DOG.
grep_demo1.txt:A Quick Brown Fox Jumps Over The Lazy Dog.
grep_demo1.txt:a quick brown fox jumps over the lazy dog.
grep_demo1.txt:A QUICK BROWN FOX JUMPS OVER THE LAZY DOG.
the lazy ဆိုတဲ့စာသားပါဝင်သမျှကိုမြင်တွေ့ရမှာပါ။
Desktop မှာရှိတဲ့ File နှစ်ခုတင်မဟုတ်ဘဲ demo ဆိုတဲ့ Folder အောက်က File ကိုပါရှာဖွေမယ်ဆိုလျှင်တော့ -r (recursive) ကိုသုံးနိုင်ပါတယ်။
Command
$ grep -r "the lazy" *
Output
demo/grep_demo.txt:a quick brown fox jumps over the lazy dog.
grep_demo.txt:a quick brown fox jumps over the lazy dog.
grep_demo1.txt:a quick brown fox jumps over the lazy dog.

Command Output အားရှာဖွေခြင်း
Command တစ်ခုက ထွက်လာတဲ့ output ထဲကမှ သတ်မှတ်စာသားပါဝင်တဲ့ စာကြောင်းတွေကိုပဲ ရွေးထုတ်ချင်လျှင်တော့ | (pipe) ကို သုံးရပါတယ်။
command | grep -[options] text_to_search
Command
$ netstat -a | grep -i listen
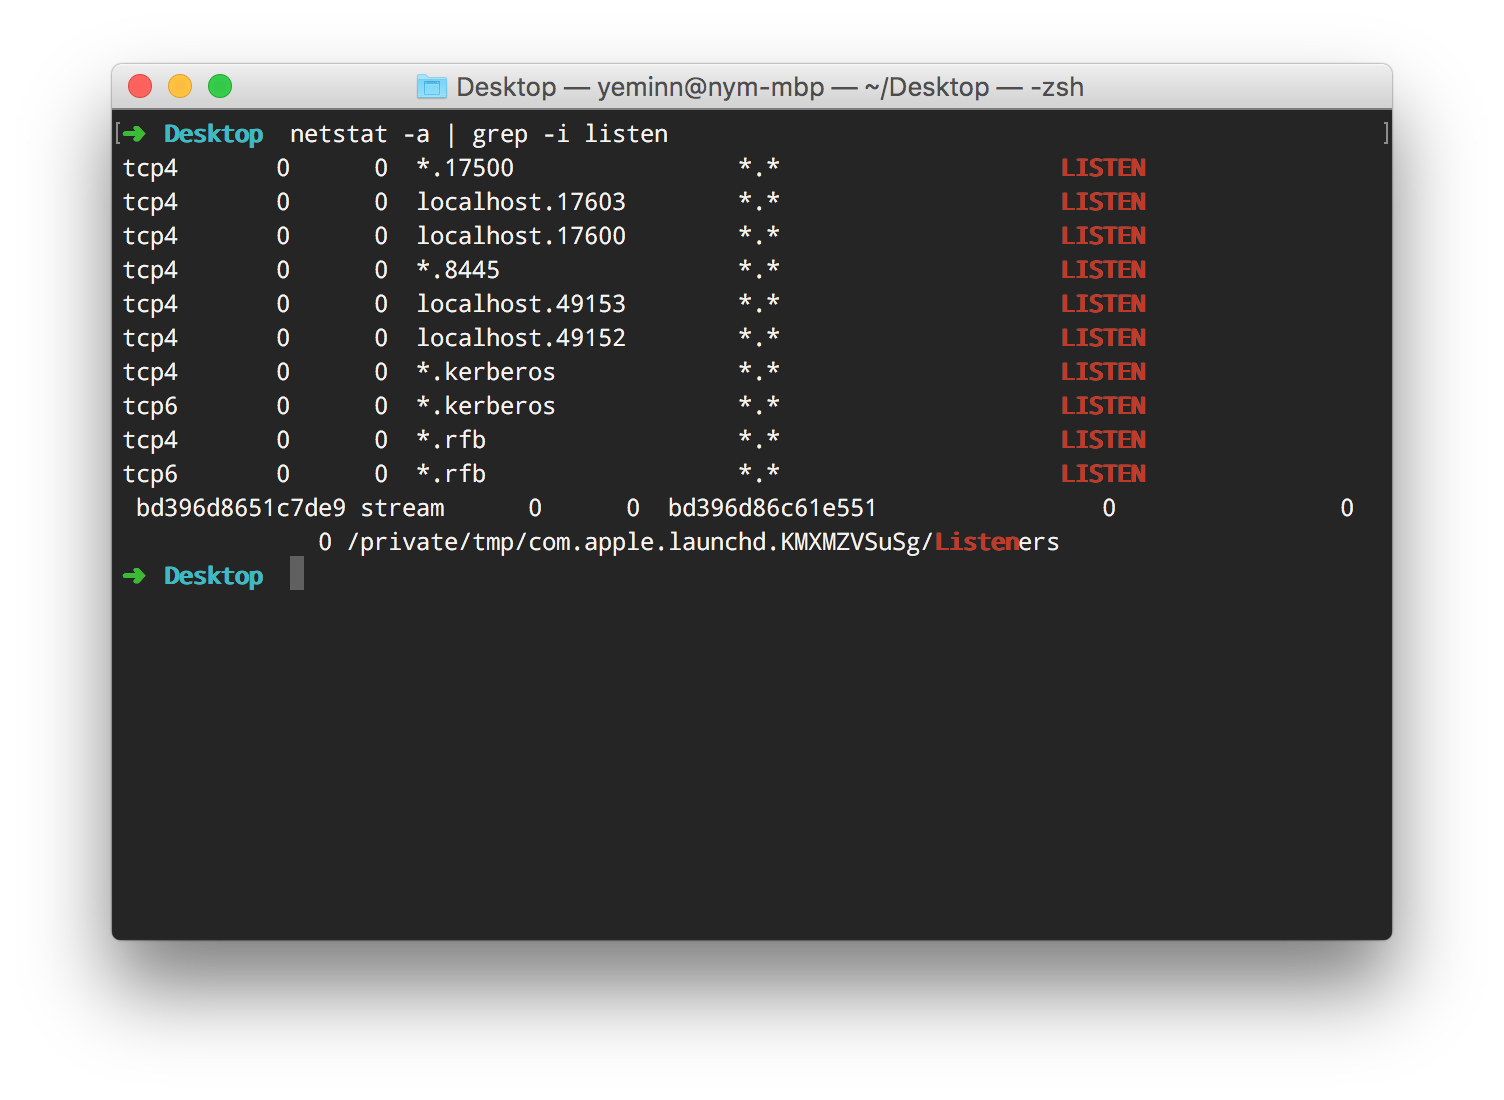
အပေါ် နမူနာကတော့ netstat command ကထွက်လာတဲ့ output ထဲကမှ listen ဆိုတဲ့စာသားပါဝင်တဲ့ စာကြောင်းတွေကိုထုတ်ပြပေးတာပဲဖြစ်ပါတယ်။ နောက်ထပ်နမူနာတစ်ခုအနေနဲ့ -
Command
$ history | grep -c fox
ဆိုတဲ့ command ကို ရိုက်ကြည့်ပါ။ Terminal မှာ အသုံးပြုထားတဲ့ command တွေထဲ fox ဆိုတဲ့ စာလုံးပါဝင်တဲ့ command အရေအတွက်ကိုမြင်ရပါလိမ့်မယ်။
GREP မှာ အခြား အသုံးပြုနိုင်တဲ့ Option တွေအများကြီးရှိပါသေးတယ်။ ဒီ post မှာတော့ အသုံးများတဲ့ option လေးတွေကိုပဲဖော်ပြပေးထားတာပါ။ Man Page သုံးပြီး ထပ်မံ လေ့လာကြည့်စေချင်ပါတယ်။ နောက်ပြီး RegEx (Regular Expression) သုံးပြီး ရှာဖွေတဲ့နည်းလမ်းတွေလည်းရှိပါသေးတယ်။ အဲဒီအပိုင်းကိုတော့ နောက်ထပ် Post တစ်ခုအနေနဲ့ ထပ်မံဖော်ပြပေးပါဦးမယ်။